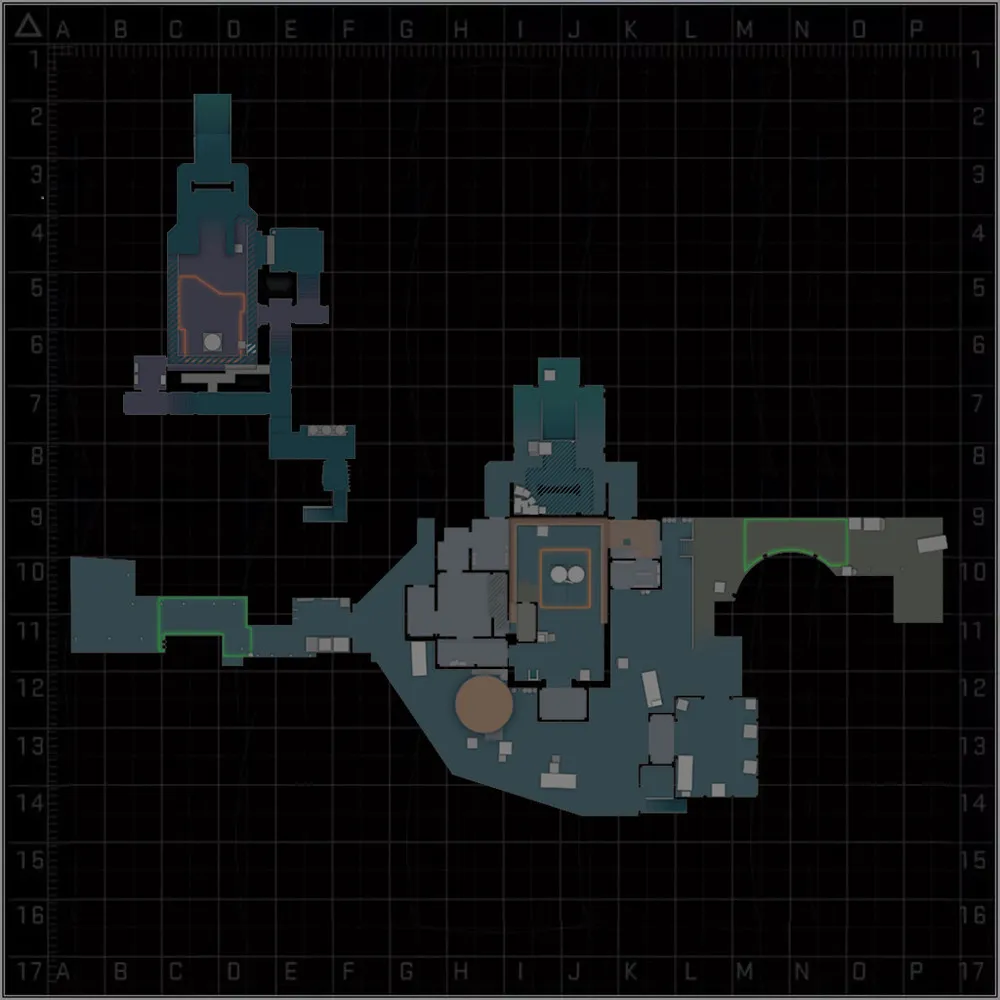
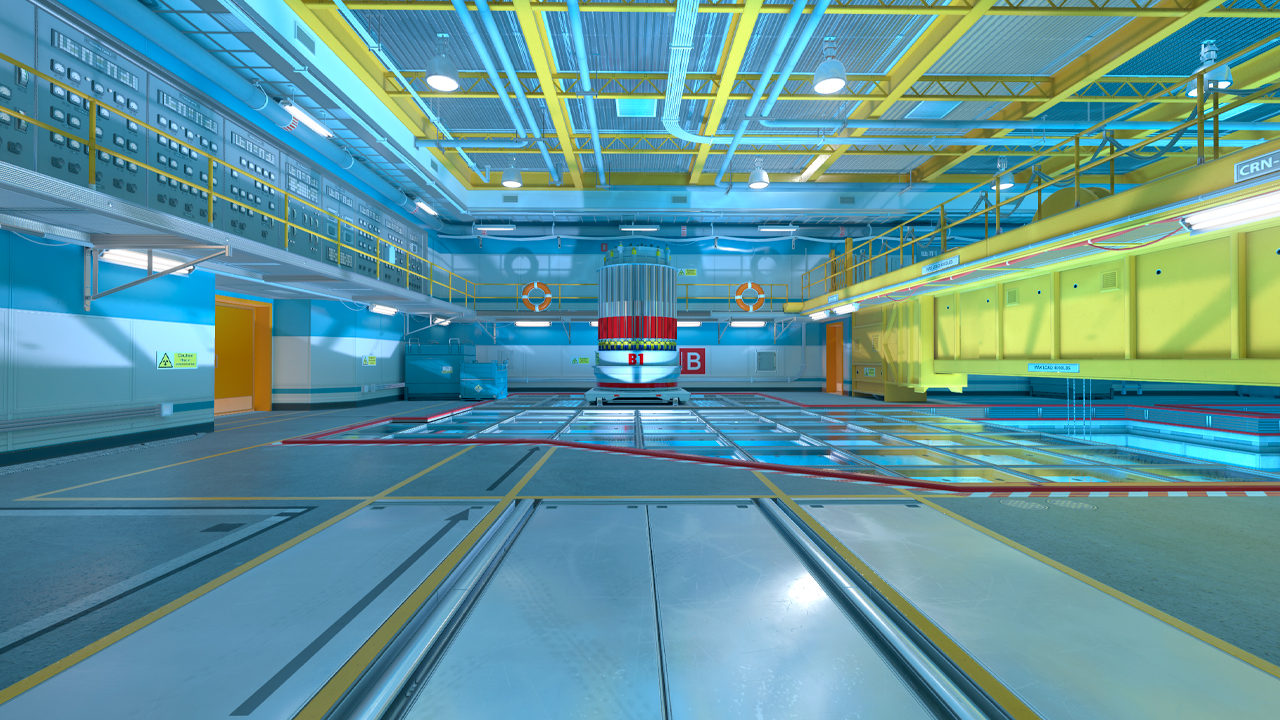
Nuke is one of CS2’s most demanding maps and remains a regular pick in both matchmaking and professional play. Its two bombsites are located on different levels, so each round depends on clear calls and strong map knowledge. A position can be nearby, above, or below, which makes vague information costly. Teams need to track Lobby, Ramp, Heaven, Secret, Vents, and both sites. They can lose valuable time or miss rotations when a callout lacks context. Unlike simpler maps built around open lanes, Nuke forces players to think about vertical control and timing simultaneously. Therefore, learning Nuke callouts helps avoid confusion during competitive matches.
How Callouts Work on Nuke
Nuke callouts work differently from those on many other CS2 maps because the layout is built around verticality. The A Site is located on the upper level, while the B Site sits directly below it, and the map also features underground routes. This makes floor awareness just as important as position names. A callout on Nuke often indicates whether an enemy is above or below, not only left or right. Since the radar offers limited help in these multi-level situations, voice communication becomes the primary way to share useful info.
Sound also plays a major role on Nuke. Doors, footsteps, activity around Squeaky, and movement between floors can reveal positions before anyone is seen. A drop into Vents from A Site, for example, can signal a fast rotation toward B. These details become easier to read with experience. Nuke callouts remain the same in both Premier and regular matchmaking, so learning them once applies across both modes.
Also known as:
– CT
Also known as:
– Warehouse
Also known as:
– Vending
Also known as:
– Back Ramp
Also known as:
– Nine
Also known as:
– Single
Also known as:
– Lower Ramp
Also known as:
– Double
A Site Callouts

On A Site
These callouts focus on A Site and the positions around it. Most fights here are decided by crossfires and control of the angles surrounding the plant zone.
- A Site: The upper bombsite where the bomb can be planted. It gives Ts direct access to post-plant positions, while CTs can contest it from Heaven, Rafters, Main, and Hut.
- Main: The entrance from Outside into A Site. It’s useful for late splits, CT retakes, and holding rotations.
- Tetris: The boxes next to Hut on A Site. This position gives cover after an entry and can be used to break the CT crossfire from Rafters or Heaven.
Heaven and Rafters
This group covers the elevated positions around A Site and the space below them. These positions are important because they control vision, rotations, and retake paths between the upper and lower parts of the map.
- Heaven: The elevated balcony above A Site, connected through the upper rotation routes. It gives CTs a clear angle over the site and is often used to hold A, support teammates from above, or start retakes.
- Hell: The position directly below Heaven. It connects CT rotations, Ramp access, and lower movement.
- Rafters: The elevated catwalk and beam area around A Site. It gives CTs strong positions to watch upper-site entries, support the A anchor, and delay pushes from Hut, Squeaky, or Main.
- Mustang: A position above Hut on the A Site rafters side. From there, CTs can catch Hut entries off guard.
- Bridge: Bridge connects Rafters to Mustang. This narrow walkway provides an aggressive angle over the Hut exit, but leaves defenders exposed to crossfires from the main site.
T Entries
These calls cover the main T-side routes into A Site and toward Ramp. They are important for reading the start of a round, identifying early pressure, and understanding whether the attack is heading upper or lower.
- Hut: The small structure that leads from Lobby into A Site. It’s one of the fastest T entries onto A and is often used with flashes to overwhelm close defenders. Its walls can also be shot through, so players inside can take damage even before the entry starts.
- Squeaky: The door next to Hut that opens directly into A Site. It can create a sudden entry timing, but the door sound often gives CTs clear information. The door can be shot through, making this area risky when opponents expect pressure from Lobby.
- Lobby: The area that connects Hut, Squeaky, Ramp, and the inner routes. It’s the main staging point for T-side defaults, fakes, and late-round decisions.
- Trophy: The room between Radio and the Ramp route, marked by trophy displays. It helps Ts move toward Ramp while staying inside, and CTs can use it to read or delay lower pressure.
- Radio: The room with vending machines near Lobby. It works as a transition point toward Trophy and Ramp, making it useful for setting up lower attacks or holding against CT pushes.
B Site Callouts
On B Site
The callouts below cover the lower bombsite. B Site can be entered from several routes, so clear calls are very important here.
- B Site: The lower bombsite where the bomb can be planted. It’s the main target after Ramp, Secret, or Vent control, and post-plant setups often depend on holding the entrances around it.
- Window: The small room with a glass window that can be broken. It gives a view toward B Site and helps players check movement before entering or retaking the site.
- Decon (Single): The single-door entrance near B Site. CTs often use it for retakes, while Ts can hold it after the plant to stop rotations. The door can also be shot through, so players shouldn’t stay too close to it for long.
- Doors (Double): The double doors leading into B Site. This entrance is used for direct site fights, so it often becomes a key point during entries and retakes. The doors can be shot through, which makes the position risky when opponents expect someone behind them.
- Dark: The closed corner on B Site. CTs can wait there to punish fast entries, but the position must be cleared as it’s common in close fights.
Ramp and Approaches
These callouts focus on the main route from the upper part of the map toward B Site.
- Ramp: The wide area leading toward B Site. CTs often fight for it early or fall back from it to delay a lower push.
- Boost: An elevated position often used around Ramp-side control. It can create an unexpected angle for CTs and force Ts to clear more than the standard Ramp positions.
- Turnpike: The connector between Hell and the Ramp area. Here, CT players usually wait for the T-side to exit Control to prevent them from reaching Ramp.
- Headshot: The large box on Ramp that can be used as cover. It gives players a protected angle during Ramp fights and can slow down pushes from Control.
- Big Box: The large cover near Ramp. It helps players survive pressure from Control and gives CTs time to delay the push.
- Control: The room between Trophy and Ramp. From here, the T-side usually enters Ramp to reach B Site.
- Bottom Ramp: The lower, more enclosed part of Ramp, providing a view of B Site. It has two entrances, with a large wall in the middle, which allows players to carefully peek B Site before entering.
Tunnels and Secret
These callouts are important for late rotations, split attacks, and retakes because they connect several lower entrances within a small area.
- Tunnels: The narrow corridor leading toward Doors. It is often used to approach B Site from the lower side and can become a key post-plant position after the bomb is down.
- Secret: The stairs leading from Outside down to Tunnels. It allows players to rotate deeper into B Site through Double Doors or Decon, and provides a path up to A Site through Vents.
Outside Callouts
T side
At the start of the round, these callouts help Ts move from spawn toward Outside control.
- T Spawn: The Terrorist starting position. From here, Ts can move toward Lobby, T Roof, or Outside, depending on the round plan.
- Outside: The large open area outside the main building. It works like Nuke’s middle area as it connects T side, Garage, Secret, Main, and CT-side positions. Even though this area is quite large, it’s still a little closer to T Spawn.
- T Roof: The roof reached from T Spawn by ladder. It gives Ts access to Silo and helps set up fast Outside pressure or utility throws.
- Silo: The large silo outside that can be reached from T Roof. Ts can use it to watch Outside, support smokes, or pressure defenders near Garage and Red.
- T Red: The red container near T Spawn. It gives cover during early Outside fights and is often used for peeks, smokes, and safer movement toward Secret.
CT side
From CT Spawn, these callouts mark the main defensive positions around Outside.
- CT Spawn: The Counter-Terrorist starting position. It gives CTs quick access to Outside, Hell, Ramp, and the main rotation routes.
- CT Box: The box on the CT side of Outside, near CT Red. CTs can use it as cover when watching Outside, holding the cross, or stopping Ts from moving toward Secret.
- CT Red: The red container near Garage and Secret. CTs use it for counter-peeks, boosts, and holding Ts who try to cross Outside.
Internal
These callouts cover shared routes around the main building and access to the lower part of the map. They are important for flanks, rotations, and moving between Outside, Heaven, and the lower levels.
- Lockers: The room inside near Heaven and Hell, with windows facing Outside. CTs can use it for early information, while Ts can clear it to reduce flank risk after taking Outside.
- Garage: The building that overlooks Outside. CTs often hold it with rifles or AWPs because it gives control over the open area and can stop Ts from reaching Secret.
Vents
- Vent: The ventilation through which you can get from A Site to B Site and vice versa very quickly.
- Back Vents: The lower vent exit area between Decon and Tunnels. It connects lower rotations after a vent drop and can be used to move toward B Site, Decon, or Tunnels.
Commonly Confused Callouts on Nuke
Nuke has several callouts that are easy to confuse because many positions are located close to one another or on different levels.
- Heaven vs Hell: These positions are linked, but they are on different levels. Heaven is above A Site, while Hell is below it.
- Decon vs Doors: Both lead into B Site, but they refer to different entrances. Decon means the single-door entrance, while Doors means the double doors.
- Control vs Ramp: Control is the room before the Ramp push. Ramp is the wider path that leads toward B Site.
- T Red vs CT Red: Both are red containers outside, but they sit on opposite sides of the area. T Red is closer to the T side, while CT Red is closer to the CT side.
- Vent vs Back Vents vs Tunnels: These callouts are close, but they don’t mean the same route. Vent refers to the vertical duct between the upper and lower levels, Back Vents is the lower exit area near Decon and Tunnels, and Tunnels is the corridor route.
How to Learn Nuke Callouts Faster
Nuke callouts are easiest to learn through regular practice. Start by studying the map in an empty server or on a Workshop callout map, where each name is tied to a fixed position. After that, Matchmaking or Premier helps connect those names to real rounds, rotations, and sound cues. Watching professional demos can also show how teams use callouts during matches. In addition, playing with teammates who already know the callouts can speed up the learning process, since unclear or incorrect calls can be corrected during the game. It’s better to focus on one area at a time, such as A Site, Ramp, or Outside, before moving on to the next part of the map.
FAQ
-
What are the most important Nuke callouts to learn first?
The first callouts players should learn are A Site, B Site, Heaven, Hut, Ramp, Outside, Secret, Vents, Decon, and Doors. These locations provide the basic map structure needed for entries, rotations, and retakes.
-
What's the difference between Vent, Back Vents, and Tunnels on Nuke?
Vent refers to the vertical shaft that connects the upper site area to the lower level. Back Vents is the lower exit area near Decon and Tunnels, while Tunnels is the lower corridor that leads toward Doors.
-
What are all the upper-level callouts above A site?
The main upper-level positions above or around A Site are Heaven, Rafters, Mustang, and Bridge. Heaven provides a view over A Site, Rafters refers to the elevated catwalk and beam area, Mustang is located near the Rafters and Hut side, and Bridge connects the upper positions around A site.
-
Is Nuke CT- or T-sided?
Nuke is generally considered CT-sided. Its vertically stacked sites and narrow entry points allow CTs to react quickly, while Ts need strong control of Outside, Lobby, Ramp, or Secret to consistently win rounds.


![How to Show FPS in CS2: Commands and Binds [2026]](https://community.skin.club/wp-content/uploads/2023/09/Main-x-Name-33-1.jpg)