![Dust 2 Callouts in CS2: Full Guide [2025] Background](https://community.skin.club/wp-content/uploads/2023/11/Background-11.jpg)

Dust 2 is the most famous map in Counter-Strike. Its layout stays relevant because both sides can reach the main spots at nearly the same time. The map also has clear visuals. There are few dark corners, complex details, or distracting backgrounds, which makes player models easy to spot against the environment. Although the map is considered beginner-friendly, Dust 2 callouts are still necessary in competitive matches. Players constantly use the names of common angles, paths, and rotation points. Missing one call can create confusion during a round.
How Callouts Work on Dust 2
Dust 2 was created by David Johnston and released on March 13, 2001, with Counter-Strike 1.1. It was based on the original Dust, featuring a simple layout built around balance and direct routes through Mid, Long, B Tunnels, and the two bombsites. This simplicity makes reading the radar easy, but poor timing or unclear wording can still lead to mistakes.
Callouts on Dust 2 name specific angles and rotation points that appear in almost every round. The map is very open, with long sightlines through Mid Doors, A Long, Catwalk, and B Doors. Smokes are especially important here. They cut off AWP sightlines, delay pushes, and make crosses possible. A late or unclear call can waste utility and expose a rotation.
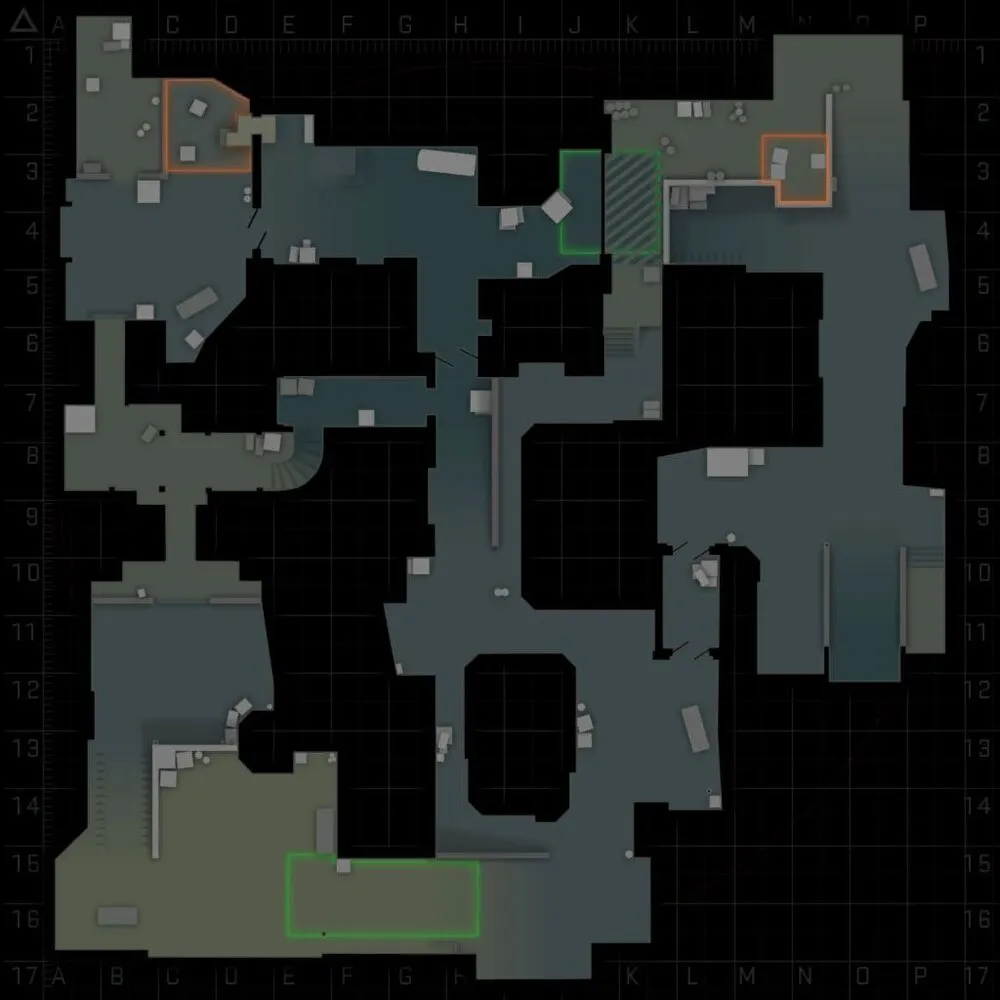
Also known as:
– Titanic
– Soccer
Also known as:
– Barrels
Also known as:
– Top Side Mid
A Site Callouts
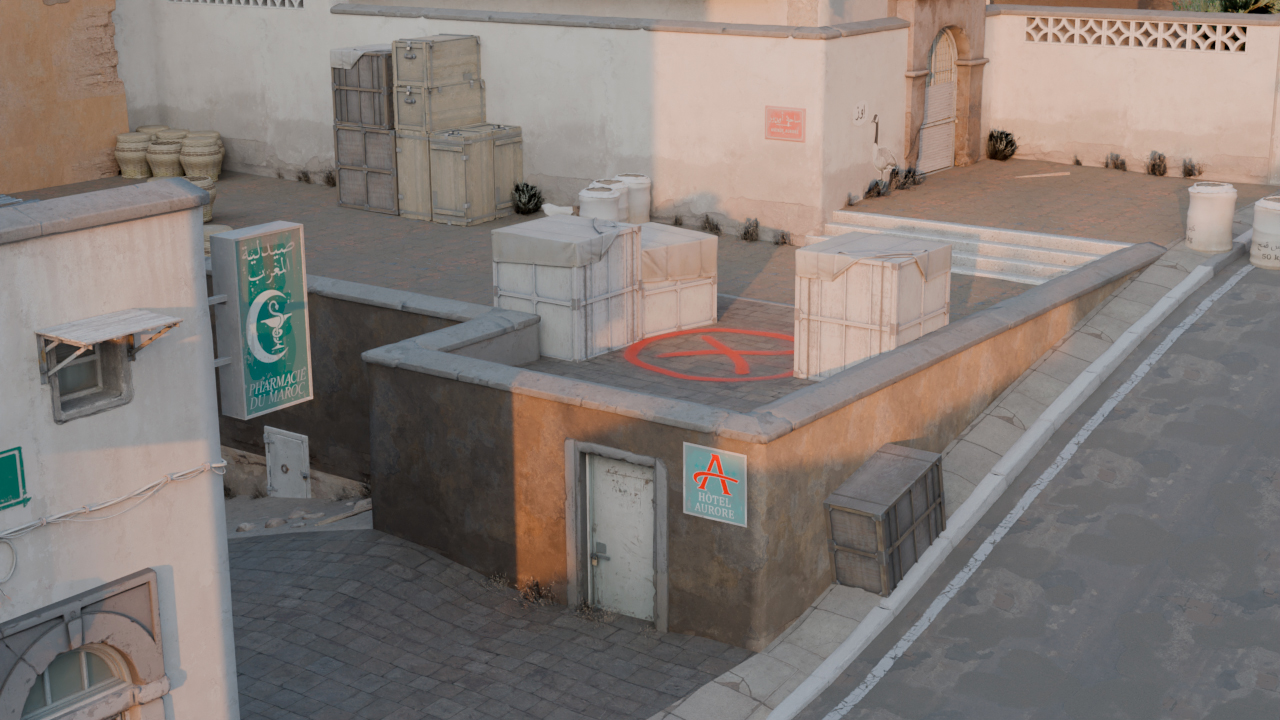
A Site
A Site is the main plant area reached from Long, Short, and CT Spawn. Most rounds here depend on utility and post-plant calls.
- A Site: The bombsite on the east side of Dust 2, where the bomb can be planted. It’s used for open fights from Long and Short, as well as post-plant setups around boxes, Ramp, and Goose.
- Default: The standard plant position on A Site, usually near the main site boxes. Ts use it when the site is cleared or partially controlled. CTs often check it first during retakes because it’s one of the most common plant spots.
- A Ramp: The sloped path that leads from Cross up to A Site. Attackers use it to enter after Long control, while defenders use it to delay the final push with flashes and Molotovs.
- Goose: The corner behind A Ramp, tucked close to the wall on A Site. It’s a common fallback spot for CTs after losing Long, and Ts usually clear it before planting.
- Ninja: The hidden spot near the A Site boxes. Ts use it in post-plant situations to catch a CT defusing the bomb. The position is often not checked properly.
- A Plat: The raised platform area on A Site near the plant zone. It gives players an angle toward Ramp and Short. CTs often jump off it to drop toward CT Spawn.
- Elevator: The area below A Site near CT Spawn. CTs use it for rotations and boosts onto the site, while attackers watch it after planting so a retake doesn’t come through unchecked.
Long
Long controls the direct route from T side to A Site. It’s open and exposed, so early control often depends on spawn timing, flashes, and the first smoke or molotov.
- A Long: The long corridor that runs from Long Doors toward A Site. Attackers use it for fast A pushes and late splits, while defenders fight for early control from A Car or Pit.
- Long Doors: The double doors at the entrance to A Long from T side. They’re used for early contact and control fights before the round spreads across the map.
- A Car: The defensive position at the corner near A Long and A Ramp. CTs use it to hold Long pushes, and attackers clear it with flashes and Molotovs.
- Pit: The low-ground area on the right side of Long when moving toward A Site. It gives cover during Long fights and becomes strong in post-plant rounds because it isn’t easy to clear without utility.
- Side Pit: The side position next to Pit, closer to the Long wall. It’s used to avoid standard pre-aim and punish players moving out of Long Doors or pushing toward A Ramp.
- Pit Plat: The raised ledge above Pit. Players use it to hold Long from a stronger angle, support Pit, or fight A Site after the bomb’s planted.
- Blue: The container area outside Long Doors. It’s useful during early Long control, especially for falling back after first contact.
- Cross: The open space between Long and A Site, watched from CT Spawn and A Ramp. Smokes are important here because crossing without cover often gives CTs a clear AWP angle.
Short
Short is smaller than Long, but it creates fast-paced timing problems because it threatens the site from above.
- A Short: The path from Mid toward A Site. Attackers use it for A splits and pushes, while CTs hold it from A Site, Stairs, Goose, or A Long.
- Catwalk: The upper route from Mid to A Short. It’s checked from Lower Tunnels and Mid Doors, so players need to move fast here while building Short control and preparing A attacks with flashes and smokes.
- Stairs: The steps near the top of Short before A Site. Players use this spot to pause before the fight, throw utility, or hold rotations from CT and Site.
- Short Boost: The box setup that allows CTs to reach Short faster. It’s used for surprise peeks and quick support.
B Site Callouts
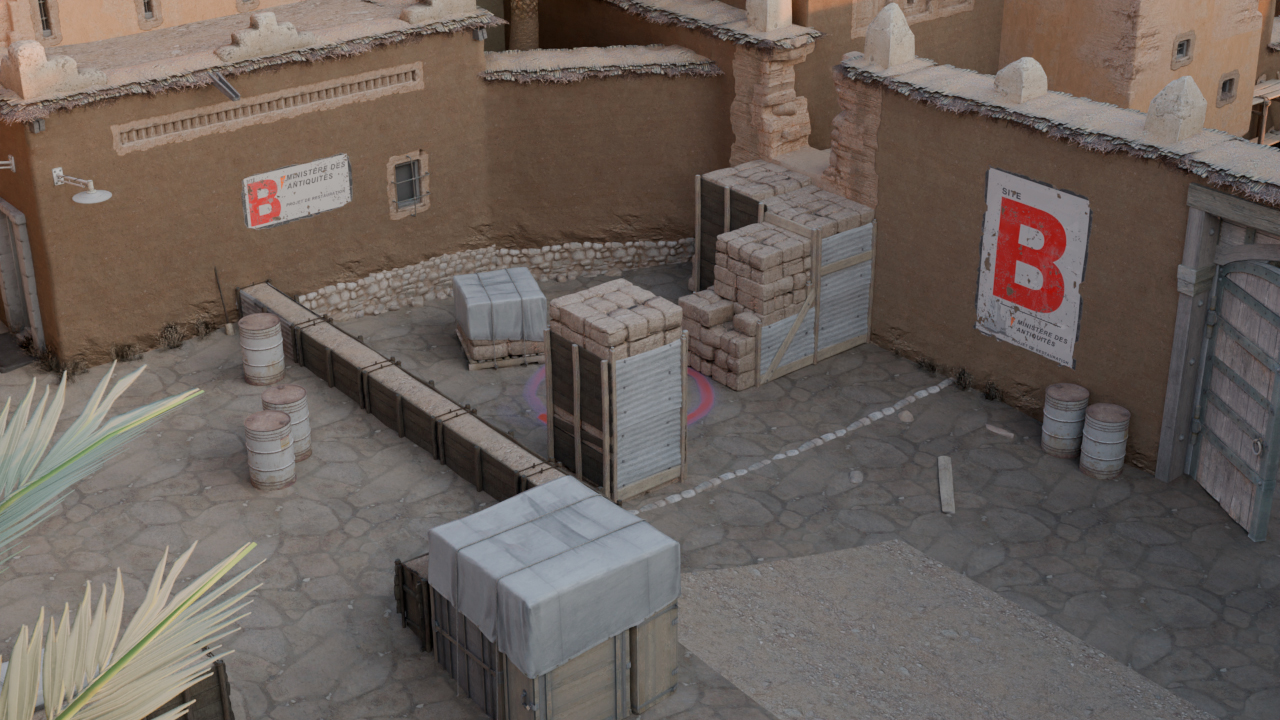
B Site
B Site is one of the tightest areas on the map. Most fights happen through Tunnels, Window, Doors, and the back of the site, so short calls are important here.
- B Site: The bombsite on the west side of Dust 2, where the bomb can be planted. It’s used for fast B pushes, late-round executes, and retakes from CT Spawn or Mid.
- B Car: The common defensive position near B Site, close to the site boxes. CTs use it to watch pushes from Tunnels, while Ts must clear it before planting or crossing deeper into the site.
- B Doors: The double doors that lead into B Site from CT Spawn. They’re used for retakes, rotations, and late peeks from CTs trying to stop a plant.
- B Window: The window on B Site with a clear view of the plant zone. CTs use it to stop Ts from planting or to retake the site and defuse in post-plant situations.
- Back Plat: The defensive position at the far back of B Site. It’s often used by anchors who want cover while watching Window, Doors, or the Tunnels exit.
- B Plat: The higher platform on B site beside the plant area, across from where players come out of B Tunnels.
- Big Box: The large crate near B Plat. It gives cover to defenders holding the choke point and can slow attackers before they enter the site.
- Fence: A defensive corner along the wall on the left side of the B Site entrance. CTs use it as a hidden anchor spot to ambush Ts right as they push out of Upper Tunnels.
- Close: The near corner by the Upper Tunnels exit into the site. CTs use it for surprise contact, so Ts must clear it quickly before the plant.
- Default: The standard plant position on B Site. It’s used because it gives safer plant timing after Tunnels control, but it can still be exposed to Window, Doors, and close site angles.
- Boost: The raised position on B Site that players can reach with help from a teammate. It’s used to create an unexpected angle over standard cover.
- Scaffolding: The metal and wood framing structure outside B Window in CT Mid. Defenders use it as physical cover and a lineup spot for throwing retake utility like smokes or Molotovs into the B Site.
Tunnels
Tunnels connect T Spawn, Mid, and B Site. This area controls many B attacks, so incorrect information can lead to missed rotations.
- Upper Tunnels: The upper part of the tunnel network that leads toward B Site. It’s the main staging area for B attacks, and players often hold here.
- Lower Tunnels: The lower part of the tunnel network that connects Tunnels with Mid. It’s used for Mid-to-B splits, lurks, and rotations between Catwalk and Mid Doors.
Mid Callouts
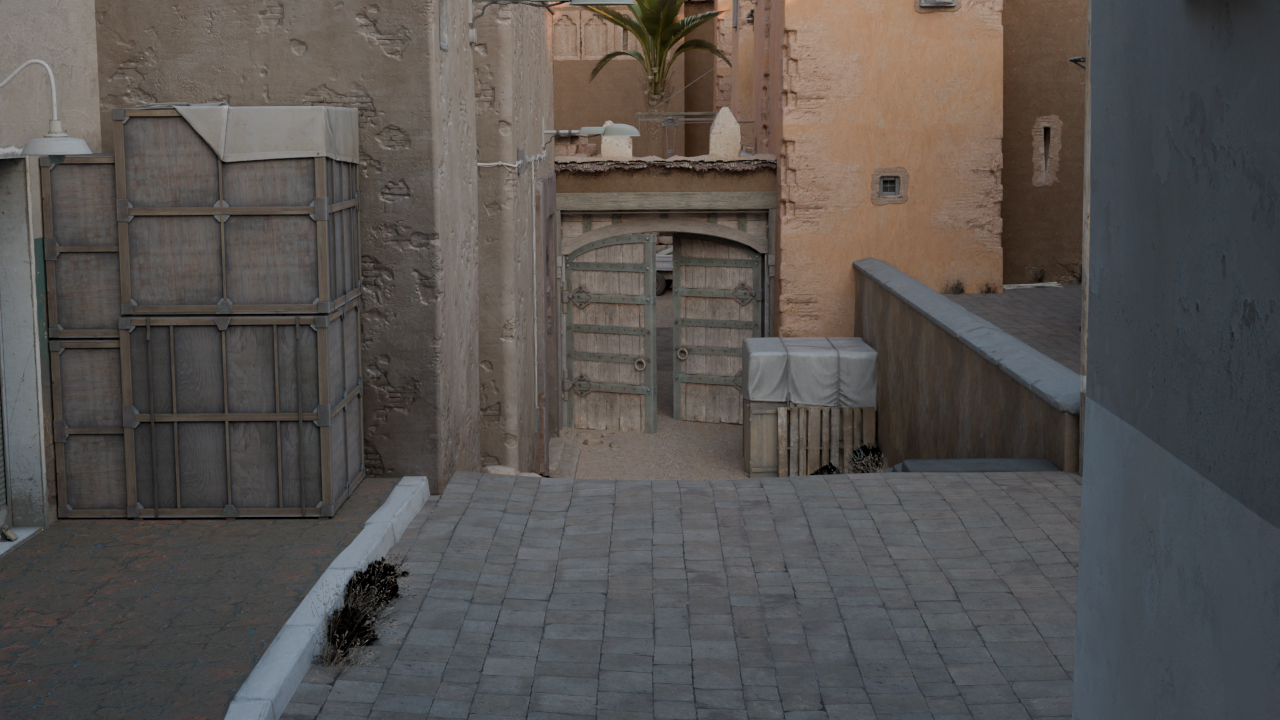
Mid connects both bombsites, T Spawn, CT Spawn, Catwalk, and Lower Tunnels. It’s one of the most important areas on Dust 2.
- Mid: The central open area of Dust 2, connecting A and B routes. It’s used for splits, rotations, and mid-round fights, so every position around it needs a clear call.
- Mid Doors: The double doors in Mid, facing CT Mid and Suicide. Ts and CTs often watch them with an AWP early.
- Xbox: The large crate in Mid used to reach Catwalk and A Short.
- Suicide: The narrow path from T Spawn to Mid. It’s fast, but it exposes players to snipers watching through Mid Doors.
- Top Mid: The elevated area at the top of Mid, close to T Spawn. Ts use it to set utility, hold pushes, or prepare pressure toward Catwalk, Mid Doors, and Lower Tunnels.
- CT Mid: The lower Mid area near CT Spawn. CTs rotate through it between A and B, while Ts try to cut it off during Mid-to-B splits.
- Palm: The position near Catwalk and Mid, named after the old palm tree spot. Players use it to hold Catwalk angles, watch Top Mid, or pause before moving into Short.
- Right Side Mid: The right-side wall area in Mid when moving from T side toward Mid Doors. It’s used for safer spacing, early peeks, and avoiding direct exposure in the open part of Mid.
- Close Mid Doors: The close corner near Mid Doors on the CT side. CTs use it for surprise contact, while Ts must clear it before walking into CT Mid.
Spawns & Outside
Spawn and outside callouts help track early movement before teams take direct fights. These areas determine first contact toward Long, Mid, and B Tunnels.
- CT Spawn: The area where CTs start each round, with access to both A and B Sites. CTs use it for early rotations, retakes, and holding Mid Doors or Cross from safer angles.
- T Spawn: The area where Terrorists start each round, with access to A Long, Mid, and B Tunnels. Ts can use it to split players across the map or set early utility.
- T Ramp: The passage from T Spawn toward B Tunnels. Ts use it to move quickly into Upper Tunnels.
- Outside Tunnels: The large area near Upper Tunnels and T Spawn. Ts use it to group before a B hit, while CTs can push it for early information. It’s also a common spot for saving a weapon when the round is already lost.
- Outside Long: The open area outside Long Doors near T Spawn. Ts use it to group for Long control, throw flashes, or wait for a late push through the doors.
- T Plat: The raised platform area near T Spawn. It’s mainly used for saving weapons or holding late pushes.
Commonly Confused Callouts on Dust 2
Some Dust 2 callouts sound similar because they are close to each other or belong to the same route.
- B Plat vs Back Plat: B Plat is the raised platform area on B Site, while Back Plat is the deeper position at the back of the site.
- Upper vs Lower Tunnels: Upper Tunnels leads toward B Site, while Lower Tunnels connects the tunnel system with Mid.
- Catwalk vs Short: Catwalk is the raised route from Mid, while Short is the final path leading into A Site.
- Elevator vs Short Boost: Elevator is below A Site near CT Spawn, while Short Boost is used by CTs to reach Short faster. Both involve vertical movement, but they affect different parts of the A defense.
Similar distinctions are also important on Mirage, where nearby positions often have separate names and tactical functions. The Mirage callouts list explains these differences and helps prevent unclear communication when switching between maps.
How to Learn Dust 2 Callouts Fast
Dust 2 callouts are easier to learn when the map is split into main areas. The basic names should come first: Long, Short, Mid, B Tunnels, both sites, and both spawns. Smaller positions such as Goose, Xbox, Pit, Car, Window, and Default can be added after that. A Workshop map is useful for matching each name with its position on the map. Moving through one route at a time also makes the layout easier to remember. Deathmatch, Premier, and retake servers then connect the callouts with round timing, utility, and sound cues. Smoke practice matters as well, since Dust 2 often depends on blocked sightlines and fast reactions.
FAQ
-
When Did Dust 2 Come Out?
Dust 2 came out on March 13, 2001, as part of Counter-Strike 1.1. It was added under the file name de_dust2 and became the direct successor to the original Dust.
-
Is Dust 2 T-Sided?
Dust 2 is not strongly T-sided in CS2. Current pro-level data shows it is close to even, with only a small T-side edge in some datasets, so side balance depends more on spawn timing.
-
What Country Is Dust 2 In?
Dust 2 is not tied to a single confirmed real-world location in the game. The map is generally based on Morocco, though some older references describe its setting more broadly as being inspired by the Middle East.


![Desert Eagle Heat Treated CS2 Guide & Patterns [2026]](https://community.skin.club/wp-content/uploads/2024/10/Main-x-Name-9-768x432.jpg)
![How to Get a Service Medal in CS2: Full Guide [2026]](https://community.skin.club/wp-content/uploads/2024/10/Main-x-Name-5-768x432.jpg)
![Recoil Control in CS2: Explanation and Tips [2026]](https://community.skin.club/wp-content/uploads/2024/10/Main-768x432.jpg)