![Inferno Callouts in CS2: Full Guide [2025] Background](https://community.skin.club/wp-content/uploads/2023/10/Background-9.jpg)
Inferno in CS2 is built around tight routes and open grenade paths. Its skybox has no invisible ceiling, allowing grenades to travel across the map without hitting hidden limits. This makes long-range utility possible. On the ground, however, the map features narrow streets and short corridors. Since volumetric smokes fill these confined spaces and block paths without leaving gaps at the edges, knowing Inferno callouts is important for fast round information. Many areas are close to one another and share similar names, making the map more difficult to learn.
How Callouts Work on Inferno
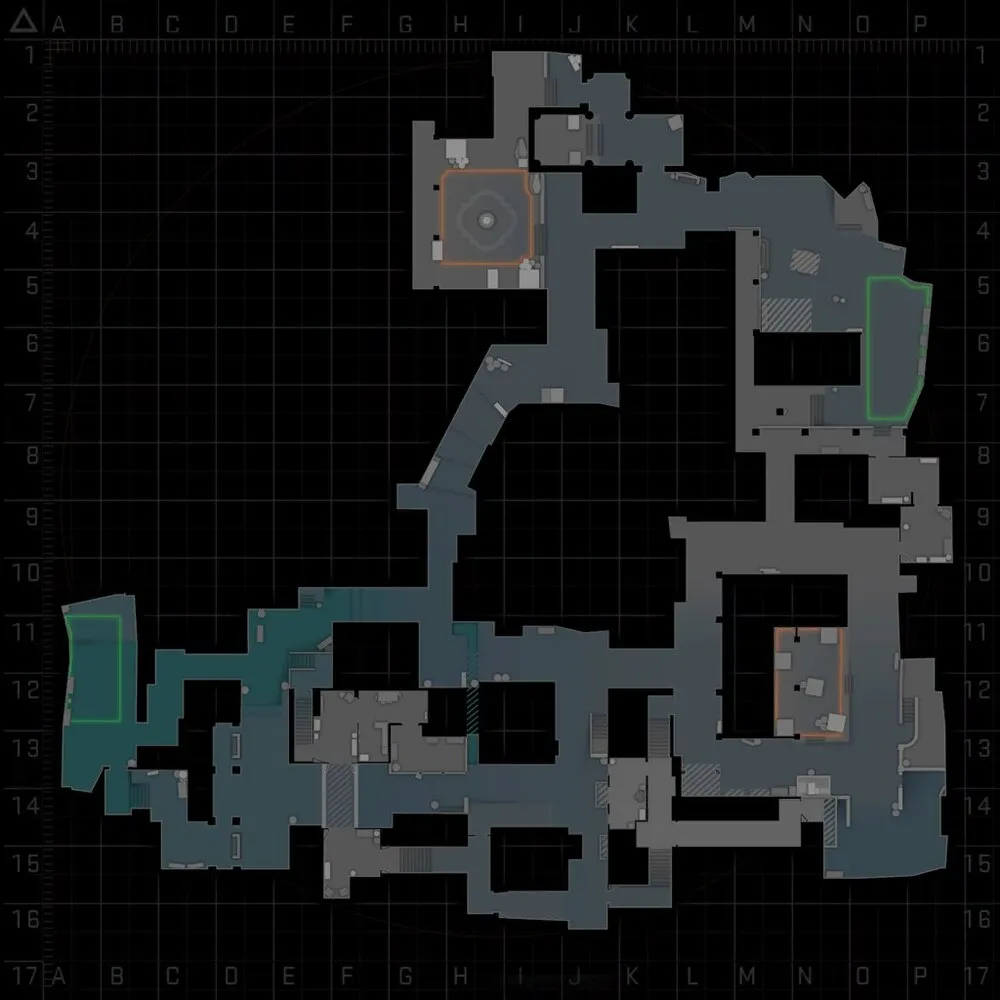
Inferno first appeared in 2001 and has remained part of every main entry of the series. The CS2 version keeps the village layout, with stone streets, buildings, apartments, and small courtyards connecting the two bombsites. Although A and B are not far apart on the map, the available routes make them feel much farther apart during a round. Banana, Mid, Apps, Library, CT, and Pit all require precise callouts.
The 2026 update changed several A Site callouts, affecting how players describe positions. Graveyard was closed, Balcony was extended, the wall above Pit was raised, and the small window near Second Mid Balcony received clipping changes. Older callouts are still relevant, but they now require updated context.
Also known as:
– Living Room
Also known as:
– Alt Mid
Also known as:
– Mexico
– Under
Also known as:
– Close Mid
Also known as:
– Window Room
– Light Room
Also known as:
– Long Hall
– Apps
Also known as:
– Arches
Also known as:
– Cart
Also known as:
– CT Spawn
Also known as:
– Construction
Also known as:
– Spools
Also known as:
– First Oranges
Also known as:
– Second Oranges
Also known as:
– Kitchen
Also known as:
– Under Balcony
– Headshot
Also known as:
– Quad
A Site Callouts
A Site
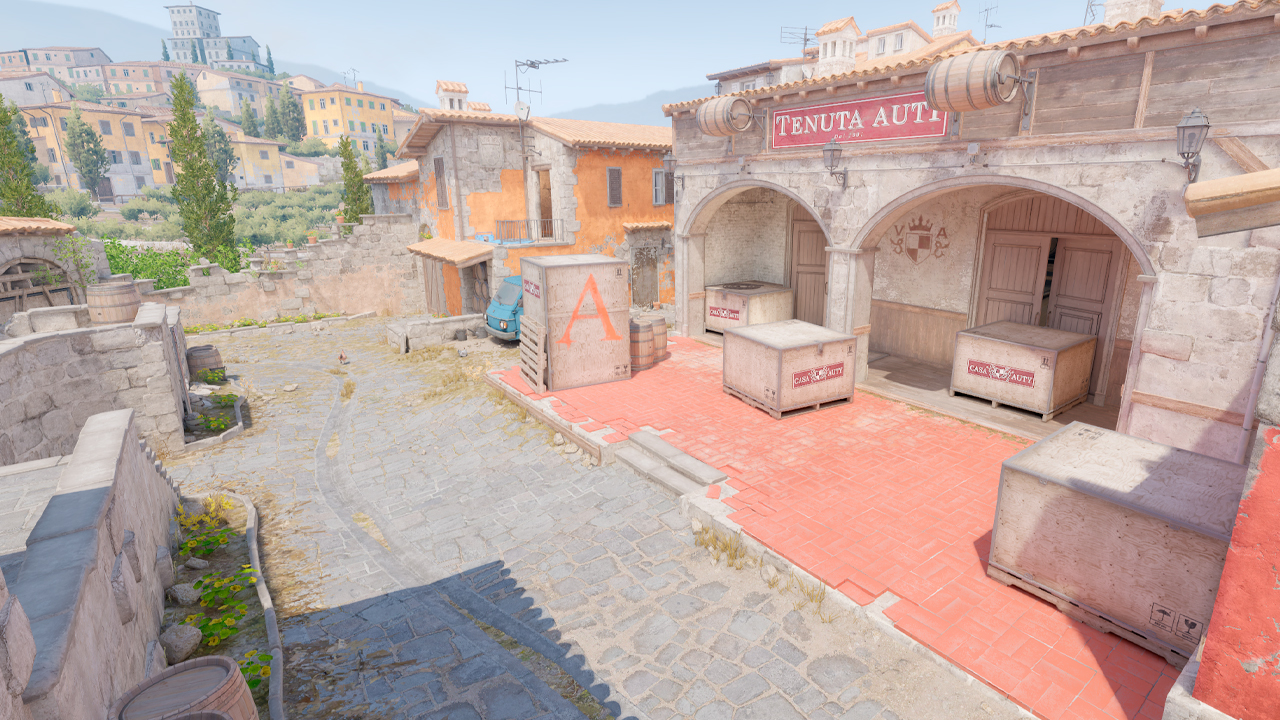
A Site has fewer safe hiding spots after the recent updates. Pit and the plant zone decide most late-round fights.
- A Site: The main plant area on A.
- Default: The common plant spot near the boxes. Ts plant here when Moto is still dangerous. CTs check it first during retakes.
- Back Site: The deeper part of A, behind the site boxes. CTs can use it to hide during a hold. Ts can play it after the plant, but the spot is easier to clear with utility.
- Pit: A key CT anchor position. It gives cover against Short and Balcony. CTs can delay the hit from here, while Ts must clear it before planting safely.
- Mini Pit: The smaller pit area under Balcony. CTs can use it to hold Short or avoid direct contact from Balcony, but the position is exposed. Ts should check it before planting, since a player there can stop a default plant or delay the entry.
- Graveyard: This position is no longer playable as a full deep hiding spot due to the iron gate. However, the remaining steps can still be used to stay out of sight from Moto, though this position leaves players fairly exposed to other angles.
- Truck: The vehicle on the Short side of A Site, used both as a positional reference and as a route for reaching Balcony.
A Entrances
A-site attacks usually begin through Short, Long, or Apartments. Each route creates different engagements.
- Balcony: The ledge above Pit and A Site. Ts use it to enter from Apartments and pressure Pit. After the extension, movement from Apps is less cramped, and fights against Pit have changed.
- Apartments (Apps): The rooms leading to Balcony. Ts use Apps for late lurks, contact plays, or split attacks on A. CTs can push or hold it early.
- Short: The narrow path from Mid to A. Ts use it for fast A hits and trade-heavy entries. CTs often fight from Site or Pit to slow the push.
- Long: The wider route from Mid toward Arch and Library. Ts use it to split A or cut rotations. CTs use Long control to keep access to Library, Moto, and CT Spawn.
CT
These callouts are closer to CT Spawn and are very important for both sides.
- CT Spawn: The Counter-Terrorist starting position.
- Library (Kitchen): The main CT rotation point behind A. CTs use it to support Site, retake through Moto, or hold Long. Ts must watch it after gaining A control because late CT swings often come from here.
- Moto: The small cover point between Library and A Site. CTs use it to hold the site edge. Ts clear it before planting because a defender there can stop the bomb or punish default.
- Truck (CT Spawn): The truck located next to the tree at CT spawn.
- Arch: The CT-side route at the end of Long, close to Library and Speedway. CTs use it to hold Long, rotate toward A, or fall back toward B.
- Speedway: The long rotation path in front of CT Spawn, connecting Arch with the B side of the map. CTs use it for fast movement between sites. Ts can call it during late rounds when cutting rotations or watching defenders move from A toward B.
B Site Callouts
B Site
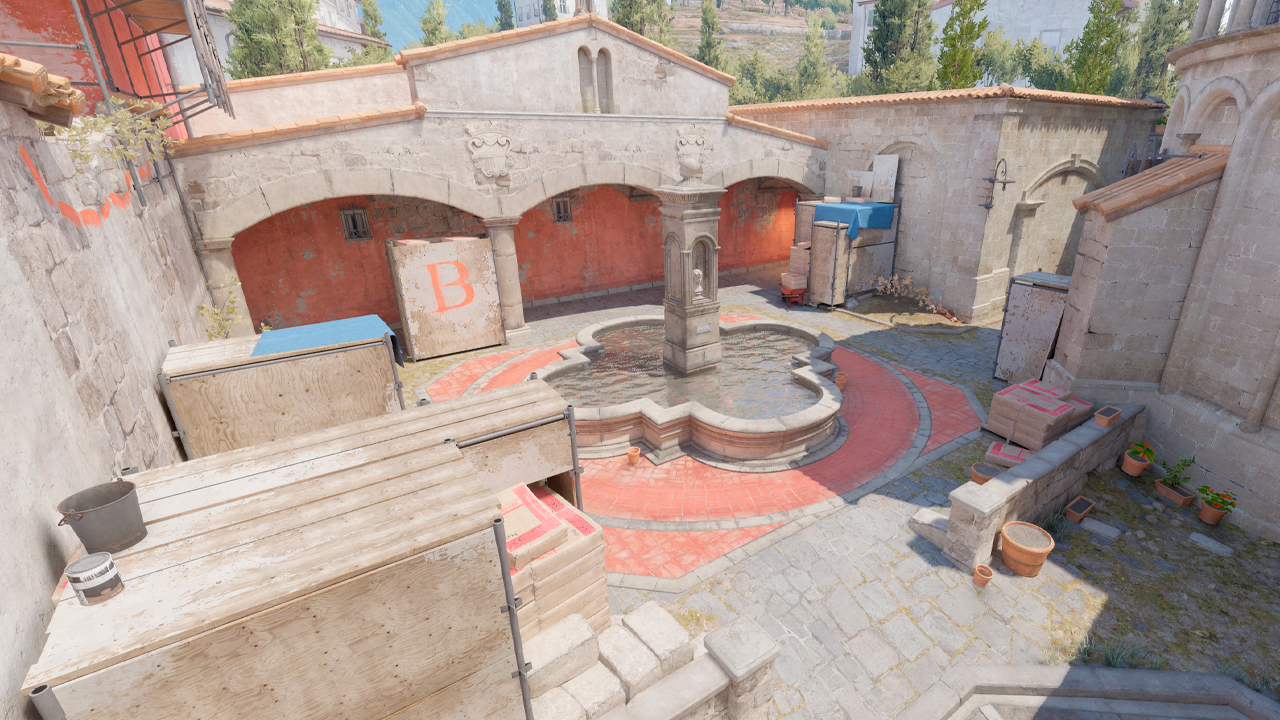
B-Site is compact and utility-heavy. Most fights happen around the plant zone, Coffins, Oranges, CT, and Construction.
- B Site: The main bomb plant area on B.
- Coffins: The back defensive spot near the B plant zone. Ts usually clear it with a Molotov or flash before crossing into B Site.
- First Oranges (1st): The small cubby between the box sets on the left side of B Site when entering from Banana. CTs can play close here to fight the first wave of the execute or swing off contact from Coffins and CT.
- Second Oranges (2nd): The nearby cubby closer to New Box and facing Fountain. CTs use it as a second-layer site position after Banana pressure starts. It can delay the plant and create crossfire with Coffins, Dark, or New Box.
- Fountain: The central part of B Site. Ts often plant near it when CT and Coffins are smoked. CTs can use it as cover during retakes, but the position is open from several angles.
- Dark: The tucked corner at the back of B Site. CTs use it for off-angle holds and late contact.
- New Box: The position on B Site used for defensive cover after Banana control is lost. CTs can play around it to delay the plant or fight late entries.
- CT Boost: The boosted position near CT. Defenders use it to see over common CT smokes and catch Ts crossing into site. Ts need to account for it when a smoke blocks normal vision from CT.
- CT: The exposed lane between CT-side rotations and B Site. This callout doesn’t mean CT Spawn. Ts smoke it during B executes to stop defenders from shooting into the plant zone. CTs use it for retakes and late support.
- Church (Construction): The area between CT rotation paths and B Site. CTs use it for retakes, flash support, and late re-clears. Ts must watch it after planting because defenders often group there before entering.
- Garden: The small green area outside Construction. CTs pass through it when rotating into B. Ts can hold it after the plant to stop Construction and CT retakes.
Banana
Banana decides most B rounds before the site fight begins. Early utility, close corners, and mid-round control make every call here important.
- Banana: The long curved route from T Ramp toward B Site. Ts fight for it to threaten B and force CT utility. CTs contest it early with grenades, then decide whether to hold deep or fall back to B Site.
- Logs: The small corner near the lower part of Banana. Ts can use it after early contact. CTs may clear it when pushing for information.
- Sand Bags: The close Banana position near the B side. CTs use it for aggressive holds and surprise swings. Ts usually clear it with a molotov because the angle is difficult to check dry.
- Car: The cover point near the top of Banana. Previously a car, this position now features barrels and wooden planks that are easy to shoot through. CTs use it to hold mid-round control and delay B pushes.
Mid Callouts
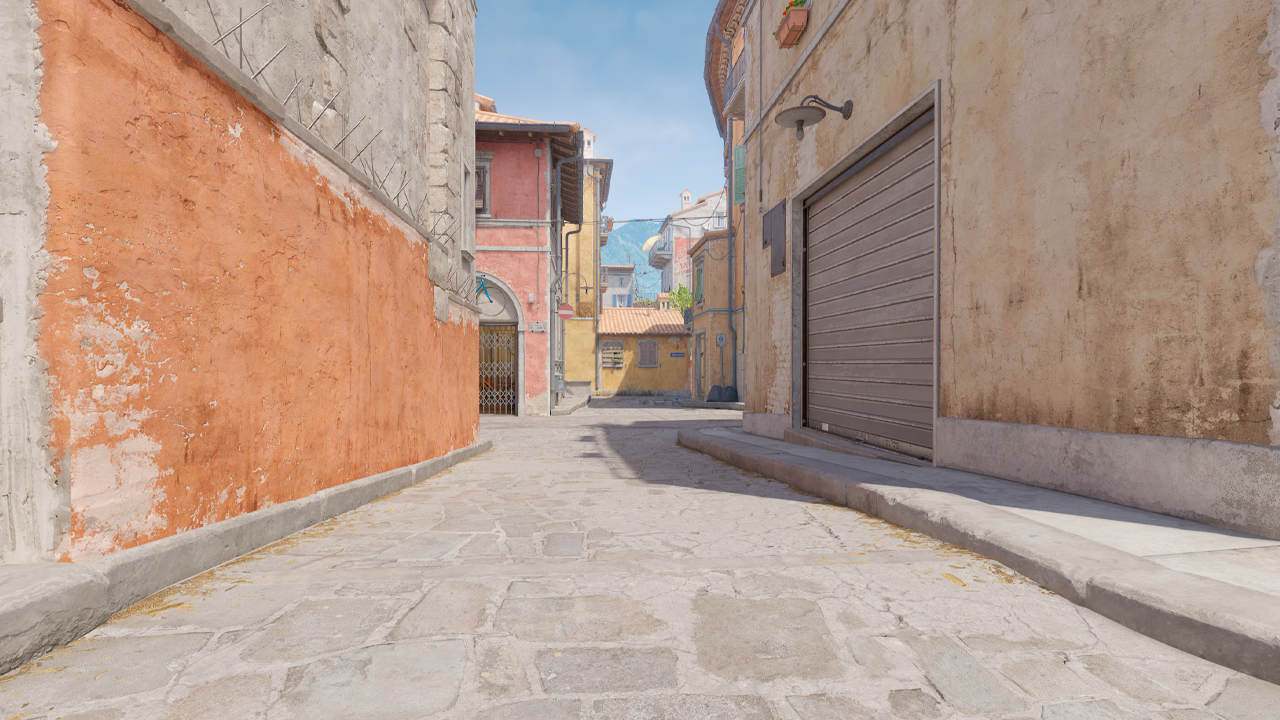
Main Mid
The primary route for taking space toward A. It gives both sides early information and often decides how much utility must be spent before a push.
- T Spawn: The Terrorist starting area. Ts split from here toward T Ramp, Kitchen, or T Apps.
- T Ramp: The sloped exit from T Spawn toward Mid and Banana. Ts use it to set early spacing before taking Mid or Banana. CTs can watch deeper angles from Top Mid with rifles or an AWP.
- Bottom Mid: The lower part of Mid, closer to T Ramp. Ts use it to group before taking Top Mid or moving through Underpass. CTs can contest it with utility from Mid or Short.
- Mid: The central lane of the map. Control of this space helps attackers pressure A from more than one direction. For defenders, vision here gives early reads and makes rotations safer.
- Top Mid: The upper part of Mid where the route splits toward Short and Long. CTs often hold it from Short or Long corner.
Second Mid & Connectors
Second Mid is a separate lane used for slower pressure and late timing. It forces attention away from the main lane, which can open gaps in rotations.
- Second Mid (Alt Mid): The parallel lane beside Main Mid. Ts use it to reach Apartments, Underpass, or Window Room. A defender watching this lane can stop lurks before they reach A.
- Stairs: The staircase between Mid and Second Mid, under the Window Room. It can be used to move between the two lanes without taking the open route.
- Underpass: The low tunnel between Mid and Second Mid. Ts use it for quiet movement, late splits, or Mid pressure from an unexpected angle.
- Boiler: The room between Apartments and Top Mid. Both sides can use this room for lurking.
- Bridge: The exposed connector from T Apps toward Kitchen. Crossing it without support is risky, since several angles can punish movement through this area.
- T Apps: The room near the T side. It works as a setup point for slower A rounds or late lurks.
- Back Alley: The area at the exit of T Apps. Attackers can pause there before moving through the halls. The position can become risky fast because escape options are limited once utility lands.
- Apartments (Long Hall): The long corridor leading toward Balcony on A Site. Control here can force defenders to worry about Balcony, Pit, and site pressure at the same time.
- Kitchen: The room near T Balcony. It’s a short transition point.
- T Balcony: The apartment balcony facing Second Mid. Ts use it to watch Window, Underpass, and Second Mid. CTs must account for it when peeking.
- Window Room: The room above Second Mid with two window angles and a balcony. It gives defenders early information, but staying there for too long can become risky.
Commonly Confused Callouts on Inferno
Some Inferno callouts sound similar because the map has many small areas located close to one another. Incorrect information can send a teammate to the wrong angle, disrupting coordination and delaying reactions.
- CT vs CT Spawn: CT is the B-side lane near the entrance from the defender side into B Site. CT Spawn is the actual defender starting area, close to the paths toward both sites.
- First Oranges vs Second Oranges: First Oranges is the closer B-site position when entering from Banana. Second Oranges is deeper on the site, closer to New Box.
- Balcony vs T Balcony: Balcony usually means the A Site ledge above Pit. T Balcony is near Second Mid, far from the final A Site entry.
- Pit vs Mini Pit: Pit is the larger defensive spot near Graveyard. Mini Pit is the smaller corner under Balcony, where a CT player can easily go unnoticed.
Similar confusion is common on Nuke, where many positions are located directly above or below one another. The Nuke callouts list explains how players distinguish them.
How to Learn Inferno Callouts Fast
Inferno callouts are easiest to learn through repetition. The fastest way to start is by loading into an empty server or using a Workshop callout map. Walk through A, B, Mid, Banana, and Apartments several times. Stop at each position and say the callout out loud. This builds a simple connection between the name, the angle, and the nearby route. Professional demos can also help because team communication demonstrates which callouts are short and effective during live rounds. Still, no method replaces practice. The names become truly useful only after they are connected to real gameplay.
FAQ
-
Is Inferno T Or CT-Sided?
Inferno is generally considered slightly CT-sided because defenders can slow rounds through Banana, Mid, and the map’s narrow site entrances. At the same time, in the current professional meta, the win rate between the two sides tends to remain close to 50/50.
-
How To Play Inferno?
Inferno should be played with a strong focus on map control, utility usage, and spacing. It is important to know grenade lineups, feel comfortable taking fights in tight corridors, and understand team tactics.
-
What Country Is Inferno In CS?
Inferno is set in Europe and is widely associated with Italy. The CS2 version features Italian signs, and many real-world comparisons point to Italian village architecture, especially towns such as San Gimignano.


![Desert Eagle Heat Treated CS2 Guide & Patterns [2026]](https://community.skin.club/wp-content/uploads/2024/10/Main-x-Name-9-768x432.jpg)
![How to Get a Service Medal in CS2: Full Guide [2026]](https://community.skin.club/wp-content/uploads/2024/10/Main-x-Name-5-768x432.jpg)
![Recoil Control in CS2: Explanation and Tips [2026]](https://community.skin.club/wp-content/uploads/2024/10/Main-768x432.jpg)